
Intended Audience
The intended audience of this article are the direct customers of SoftClinic GenX such as Doctors or Admin staff of Hospitals/Clinics (those who have the Admin rights of the system).
Pre-requisites
- Make sure you have your valid login credentials of the GenX.
- Make sure you have created an entry of that patient whose billing is to be done.
Using the Billing Dashboard
The Billing Dashboard menu displays the demographics of patients and provides you at-a-glance overview of billing done in your system as well as view the details listed in the Billing Task List.
As shown in the below image, the top-most bar displays the below data.

Figure 1: Billing Dashboard > Topmost Bar's options
- Invoices: It displays the number of Invoices (bills) generated for the selected Facility during the specific time period/date range selected.
- Collection: It displays the total amount received/collected in the form of payment as per the Invoices generated for the selected Facility, during the specified date range.
- Outstanding: It displays the total amount that is not received by the selected Facility during that specified date range and is pending to be collected for any of the services charged.
- Lost Revenue: It displays the amount of loss suffered by the Facility in that specified date range.
To search/view the Billing Dashboard, do the following:
- Login the SoftClinic GenX web application with your credentials, as provided to you by our Training team/Installation Team.
- From the left panel, go to the Billing menu. Billing menu further opens up its menu options such as Billing Dashboard, Billing, Views and Masters. The top bar is followed by a few mandatory entry fields to display the billing details; for example: the Facility Name, Visit From Date, Visit To Date, Visit Type, Status Type.
- Facility Name: Select the desired Facility (created in your system) whose patients’ billing details you need to view.
- Visit From and To Date: Select the patients’ visit’s date range. The billing details will be displayed of the patients visited the selected Facility from this particular date range.
- Visit Type: Select the type of the patient’s visit (Inpatient, Outpatient, Emergency, etc.) in that Facility within that date range.
-
- Invoiced: In SoftClinic GenX, the Bills are referred as Invoices. Hence, Invoiced means the bills are generated for the Services provided.
- Partially Settled Invoices: Those Invoices whose payment is done partially.
- Pending for Invoice: Those Invoices that are not yet generated for the Services provided.
- Pending for Settlement: Those Invoices that are paid but the full settlement is still pending (either payment type issue or unsuccessful payment).
- Search Patient entry field: Double click to add the patient whose billing details to be viewed. This opens a secondary window of Patient List for the selected Facility. Select your required Patient.
- After entering all the search criteria for the desired billing patient, click the Search button to get the respective Billing Task List.
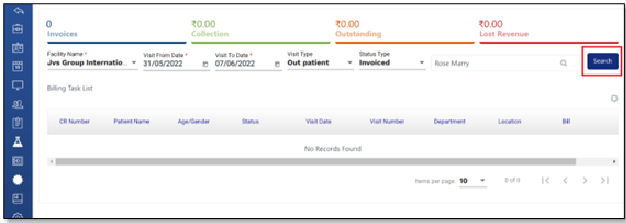
Figure 2: Billing Dashboard > search criteria added
After entering all the search criteria for the desired billing patient, click the Search button to get the respective Billing Task List.
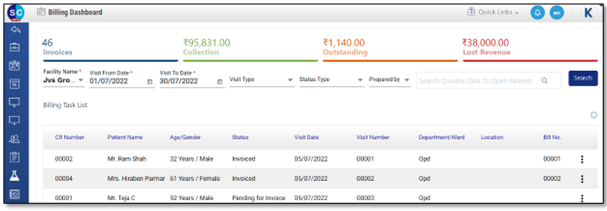
Figure 3: Billing Task List of the selected patient
- Click
 icon to view further options
 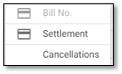 . Only that option which will be applicable on this patient is displayed as ‘enable’. For example: Here, for this patient, the Bill is generated and even the Settlement of the payment is done completely. Hence, both Bill and Settlement options are disable. Moreover, in this scenario, only Cancellations of the Bill is applicable, hence, this option gets enabled.
Click Generating Patient Bills (Bills), Settlement (content related to Figure 15) and Cancelling a Bill (Cancellations) for further details.
Generating Patient Bills
Billing menu allows you to add all types of revenues to be collected from the patient, such as, consultations fees, medicinal fees, treatment charges, etc.
You can add the payable amounts here in a single screen and can manage all types of payments/settlements and accounting of a patient. Hence, you can generate an Invoice (Bill) for a patient.
To generate a selected patient's bill, do the following:
- Go to the main menu, click the Dashboard
 menu to view the main Dashboard screen of the system. The left pane of the screen displays your Appointment Calendar with other main details such as Facility, Department, Clinic/Location and Doctor, whereas the right pane displays patient and other details of your today’s appointment such as Time, Patient Name, Age/Gender, Mobile, Status, Consultant and City.
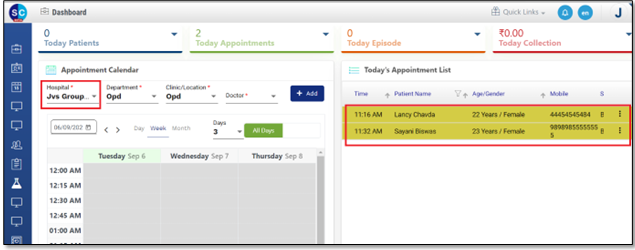
Figure 4: Dashboard Main Screen
-
On the right pane, select the patient record for whom you want to proceed further for Billing. Click
 icon to view the further sub-menu items, as shown in below figure.
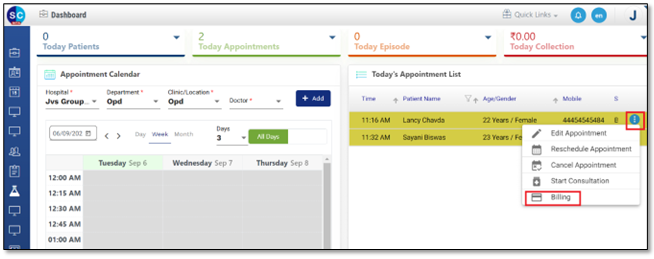
Figure 5: Dashboard > Appointment's sub-menu options
- Now, to generate an invoice/bill for the selected appointment/patient; click the Billing sub-menu option. This opens the main Billing window of the selected patient. As shown in below figure, the patient’s Visit and Service Order’s details gets displayed automatically.

Figure 6: Billing window > to proceed with 'Billing' of the selected patient
- On this window, the patient’s name, age and consulted doctor displays automatically. Click the drop-down arrow to view the Patient Card with more auto-downloaded details of the selected patient, as stored in the system, as shown in Figure 7 and Figure 8.
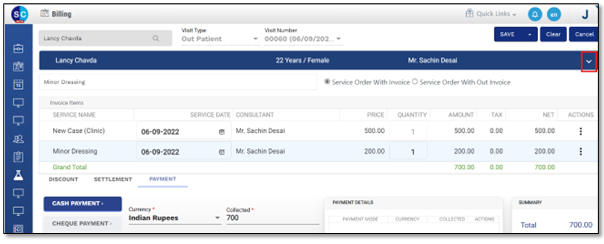
Figure 7: Patient's details > click the drop-down arrow
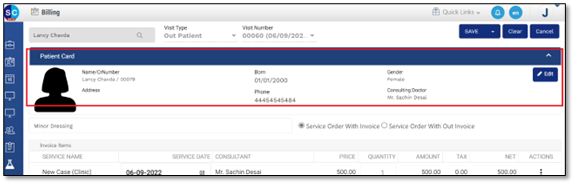
Figure 8: Patient Card gets displayed
This will automatically display all details of the patient as recorded in the system such as Age, Gender, Visit Type and Visit Number.
- If you require to add details of another Service provided to the patient and want to calculate that too in Billing, then, you can add that Service Name from here. To do this, go to the Service Name search field and type that particular Service. The system will prompt with the related Services configured in the system. Select that Service and it will get added under the Service Name column.
Note: Only chargeable Service will be added.

Figure 9: Billing > Adding an additional Service (searching from the system)
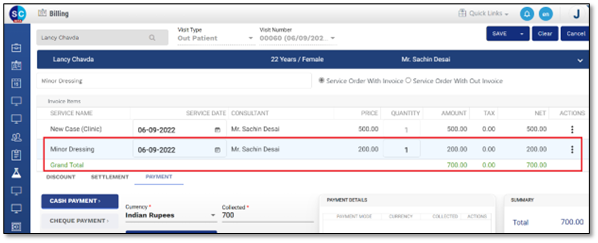
Figure 10: Billing > Added an additional Service
- Service Order With Invoice: Select this option if you want to generate the final bill of this Service for the selected patient.
- Service Order With Out Invoice: Select this option if you want to generate a running bill (not the final one) of this Service for the selected patient.
- In the table, following various Invoice Items can be seen:
- Service Name: Displays any type of the Services provided to the patient by the Facility, which is chargeable and whose billing is to be done. You can also add it manually if not updated automatically, as shown in above images.
- Service Date: Displays the Billing Date of the Service. The Service Date is editable; hence, you can change the Billing Date of the Service. If the patient has taken the Service on some other day than the date on which the Bill was generated, then, you can edit that date.
- Consultant: Displays the Doctor/the person of the selected Facility who treated/consulted the patient.
- Price: Displays the price charged for the Service provided to the patient.
- Quantity: This column is editable only if any other/additional Services are added manually. You can edit the quantity of the Service Name which will be automatically calculated, and the price gets displayed in the Amount. For example, if the patient undergoes follow-up consultation Service twice, then you can edit the Quantity and mention 2 under it with respect to the Follow-up Consultant Service Name, hence, the amount gets accordingly automatically calculated.
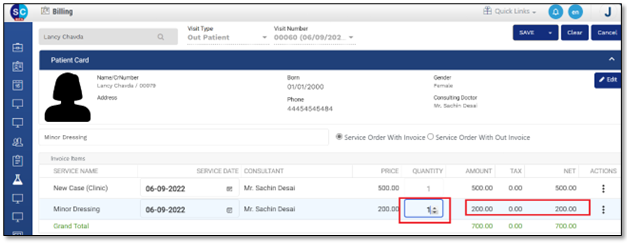
Figure 11: Billing > Editing the ‘Quantity’ of the Service
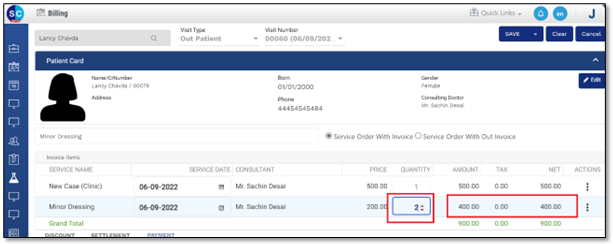
Figure 12: Billing > Edited the ‘Quantity’, the NET amount also gets auto calculated
- Amount: Displays the total amount of the Services offered and whose billing is done.
- Tax: Displays the amount of Tax added on the actual amount by the Facility.
- Net: Displays the net amount of the Billing done for the Services provided.
- Actions: Click the Actions icon to view the Delete option. It allows you to delete the selected Service.
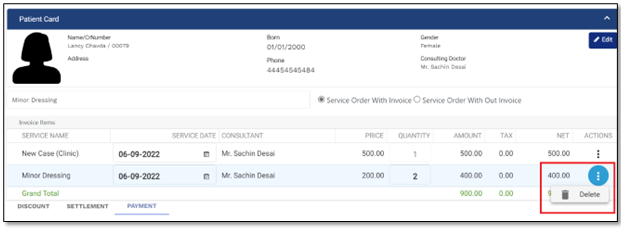
Figure 13: Service > Actions > Delete
- Discount Tab:
The Discount tab allows you to configure the details when any discount is applicable or given to a patient for any of the Services provided.
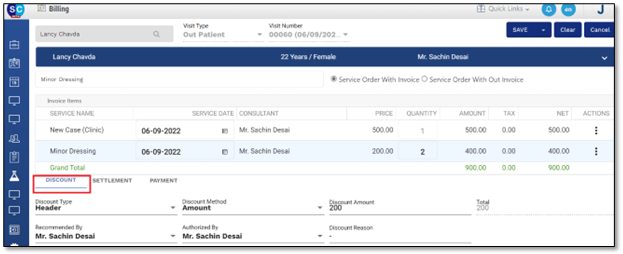
Figure 14: Billing > Discount Tab
- Discount Type: The Discount Type appears as Header, that is, the type of the discount provided is on the main Service provided.
- Discount Method: Select the discount method that is applicable for that patient. The system allows you to provide discount on the amount or percentage.
- Amount: Select Amount as the Discount Type if the discount is to be applied directly on the amount of the invoice.
- Percentage: Select Percentage as the Discount Type if the discount is to be applied on percentage of the invoice’s amount.
Note: If Discount Method is selected as Amount, then the system will display here the option as Display Amount; whereas, if Percentage is selected, then the option will be displayed as the Discount Value.
For example: Discount Method is Percentage, and the Discount Value is 10. This means, if the Invoice is of Rs 500 then 10% discount to be applied on Rs 500.
- Recommended By: Select the name of the person who had recommended your Facility or you.
- Authorized By: Select the name of the doctor who has authority of this Facility.
- Discount Reason: Enter the reason of the discount provided.
- Settlement Tab:
The Settlement tab allows you to enter the details related to the Settlements done with the patient regarding the billing amount. The system provides with two types of Settlements: Full Settlement and Partial Settlement.
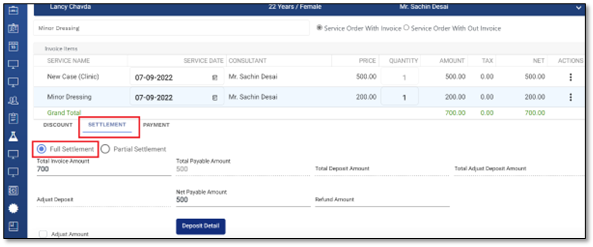
Figure 15: Billing > Settlement > Full Settlement
- Full Settlement: Select this radio button if the patient pays the full amount and complete settlement of the Invoice is done.
In case of Full Settlement, the system displays below options:
-
- Total Invoice Amount: The system automatically displays the total invoice amount generated.
- Total Payable Amount: Displays the total amount the patient is payable. It is automatically generated as per the Total Invoice Amount.
- Partial Settlement: Select this radio button if the patient pays the amount partially.
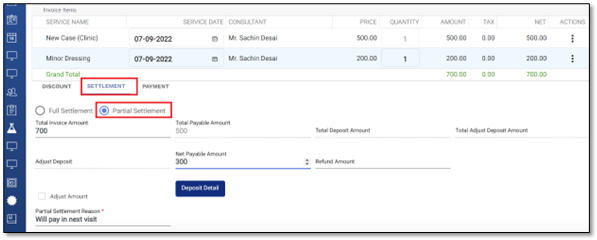
Figure 16: Billing window > Settlement > Partial Settlement
- Partial Settlement Reason: In case of Partial Settlement for any patient’s bill, it is mandatory to mention the reason here.
Note: The rest of the options are presently not in use.
- Payment Tab:
Displays the details related to the payment and the various modes of payment. The system allows you to configure the payment details done either by Cash, Cheque, Card or e-wallets.
- Cash Payment:
- For Cash Payment, the type of currency and the Collected amount gets auto-generated as per the Master.
- Click Add button, once the payment is done, as shown in below figure.
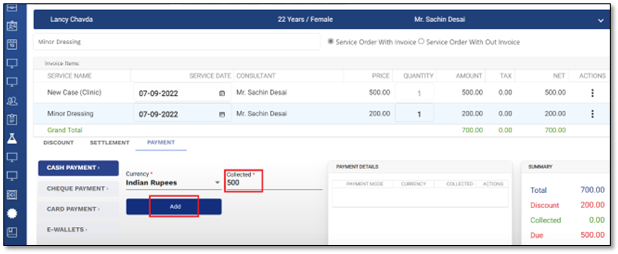
Figure 17: Billing > Payment tab > Cash Payment > Payment gets listed automatically
- The Payment Details column box displays the payment details.
- The Summary column box displays the summary of the patient’s payment, as shown in the below figure.
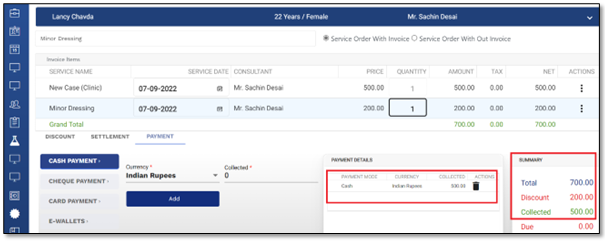
Figure 18: Billing window > Click Add to add the payment > Payment displayed as ‘Collected’
- Cheque Payment:
- Enter all required details of the Cheque and the respective Bank.
- Once the details are filled up, click the Add button to get the payment details and summary displayed.
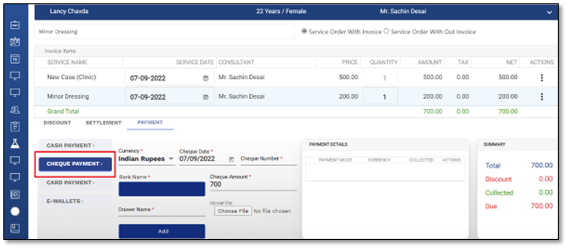
Figure 19: Billing window > Payment > Cheque Payment
- Card Payment:
- Enter all the required details of the Card belonging to the patient and its respective bank.
- Once the details are filled up; click the Add button to get the payment details and summary displayed.
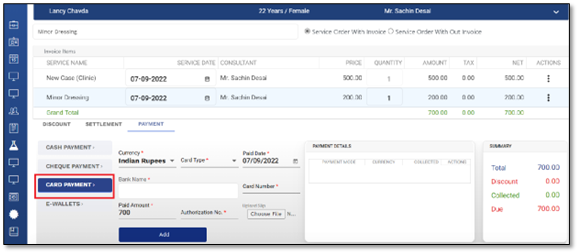
Figure 20: Billing window > Card Payment
- E-wallets:
- Enter all the required details of the e-wallet.
Note: E-wallets type of payment is not in use for now.
- Once all the configurations are done on this window, click the Save button to save the details.
- Click the drop-down arrow of the Save button to view its further options: Save and Print and Bill. Click the Save and Print option to save this patient’s bill as well as print it in .pdf form.
- As shown in the figure, the print view of the Invoice cum Receipt (Bill) to be printed displays the following details:
- The topmost section displaying all the patient’s details along with a Barcode. Barcode on the bill enables you to scan the patient’s or the bill’s details whenever required and the details can be fetched.
- The next section displays the Service Name, Service Date and other Service details provided by the Facility to the patient.
- The last section displays the Payment Summary with all payment related and the receipt number.
- The right most pane of the Bill provides you with the options: Print, Download and Email.
- Print: To get a hard copy of this Bill, select Print option which further asks you to select the printing layout: Letter Head or Plain Paper. Select the desired layout and click the Print
- Download: To download the soft copy of the Bill and save it on your local folder, select the Download
- Email: To mail the Bill to the patient, select the Email option.
Note: Other than Printing and Downloading the Bill, after the billing is prepared with all its settlements, a notification is also sent to the patient by the Facility either via a SMS, e-mail or WhatsApp.
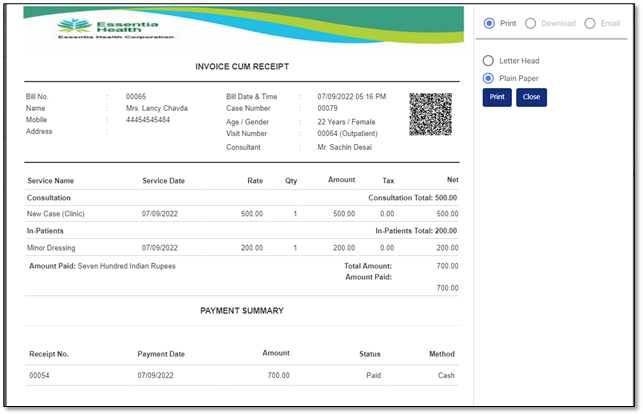
Figure 21: Patient’s Invoice (bill) print view
Cancelling a Bill
In case of any issues, you can even cancel the selected patient’s bill.
To Cancel the selected patient’s bill, do the following:
- Go to the Billing menu > Billing Dashboard option > Billing Dashboard
- Enter the search criteria and search the patient whose bill you want to cancel.
- Click the
 icon to view the further menu options. Click the Cancellations option to proceed further with the bill cancellation and opens the Cancellation screen, as shown below.
The system displays the auto generated/auto selected patient’s name and details, whose cancellation is initiated.
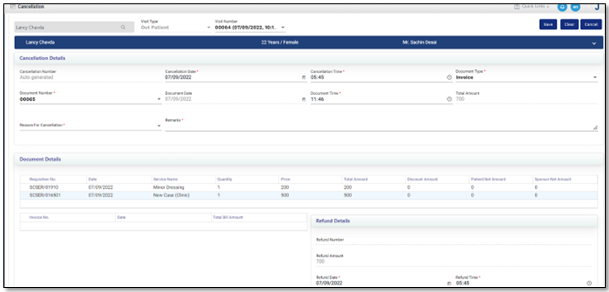
Figure 23: Cancellations window > Cancellations Details
Under the Cancellation Details section,
- Cancellation Number: It is auto generated by the system.
- Cancellation Date and Time: Select the date and time on which the bill is cancelled.
- Document Type: Select the type of the document that are attached or included with the bill.
- Document Number: Select the Document Number from the drop-down option.
- Document Date and Time: Select the submitted/existing documents’ date and time.
- Total Amount: This option automatically displays the total amount based on the Invoice and Settlement’s cancellations.
- Reason For Cancellation: Select the applicable reason for cancelling the bill.
- Remarks: Enter your remarks, if any.
As shown in the above figure, the Document Details section displays the various details of the patient’s details.
Any cancellation of the bill results into the refund of the amount.
Note: The Refund Details section is not functional for now.
After all the required fields and other details are entered, click the Save button.
Viewing the Bill List and the Receipt List
The Viewing menu lists all the Bills and Receipts generated by the system for your Facility. You can just view the list, cannot edit them and if required print them or export to .csv file.
- Go to the Billing menu > Viewing sub-menu > to view further two options: Bill List and Receipt List.
- Click the Bill List option to view the Bill List window, as shown below.
- A filter is provided for the Bill No. as well as Patient Name that enables you to quickly filter out your desired Bill record from the large list, either via Bill No. or Patient Name as the search criterion. Click the Filter icon (
 ) and type the Bill No. or Patient Name in the editable field that appears in the respective column. The system will prompt you with the related search results, click it to directly view that particular Bill.
 - Click the icon to Print that particular Bill.
- Click the Export to .csv button to export the entire Bill List into a .csv format. It will be downloaded and saved in your default download folder.
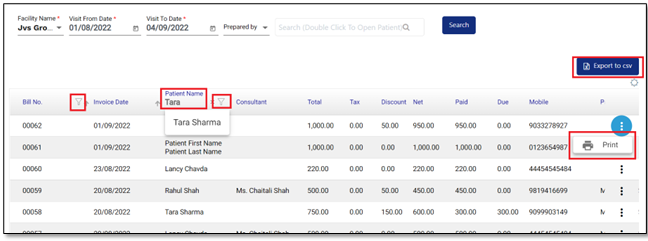
Figure 24: Viewing Bill List
-
Go to the Billing > Views > Receipt List to view the Receipt List screen displaying the list of all receipts of the selected date range, as shown in Figure 25: Viewing Receipt List.
- Like Bill List, click the Filters icon provided for Receipt No., Bill No., Patient Name and Visit No. to search the respective record by using either of these filters.
- Click the to print the respective Receipt.
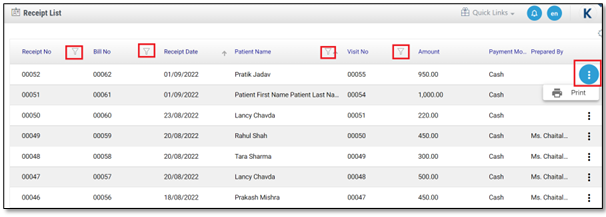
Figure 25: Viewing Receipt List
Comments
0 comments
Please sign in to leave a comment.